Examination Process
Oral diagnosis is seldom just the identification of a single disease in the mouth, but rather it is a disclosure of conditions of an oral or a systemic nature that will require treatment or management. The dentist should be concerned about the patient's total health, the relation of the oral cavity to the patient's general systemic health, the effect of systemic health on the management of the patient's oral conditions, and the patient's self image. A diagnosis need not be negative. It can be a confirmation of good oral health, healthy tissues, and the absence of disease. Modern dentistry places emphasis not only on the control of disease, but also on the prevention of disease.
To collect data about a patient is an ongoing process. Typically a patient visits the dental office as a new patient who seeks complete and thorough treatment for conditions that he or she may or may not be aware exist, as an emergency patient for treatment of a specific or chief complaint, or as a returning patient of record for continuing care. Each of these situations requires some type of clinical and radiographic examination, a review of the medical history, and a diagnosis. Regardless of the course of treatment the patient may need, the most complete and accurate information must be obtained to enable the dentist to obtain an accurate diagnosis.
The phases of oral diagnosis focus on the patient's personal, medical, and dental history: the clinical examination; radiographic; photographic, and diagnostic models; laboratory tests; and the diagnosis. A diagnosis is seldom made after the review of a single phase of history. Each phase provides the dentist with different but interrelated information, and when all are combined they contribute to the final diagnosis.
Classification of Dental Instruments
Another of G.V. Black's major contributions to operative dentistry was the classification of dental instruments. He classified instruments into six categories according to their function or use: cutting (hand and rotary); condensing; plastic; finishing and polishing (hand and rotary); isolation; and miscellaneous. Since many changes have taken place in the twentieth century, the list below is a modification of these classifications representative of hand instruments commonly used in operative dentistry today. Technology moves at such a rapid pace that it is possible new categories can soon be added to this list. This classification should enable the assistant to review instruments according to their function and then identify them according to their physical characteristics.
Table 1 provides a descriptive overview of each of the instruments in each of these six categories. For any dental assistant the task of learning all of the dental instruments in the office seems overwhelming at first; however, this table, combined with a review of manufacturer catalogs and actual visualization of instruments in action will make this task easier.
We have added the category of examination instruments to designate instruments used specifically for examining the teeth and oral tissues. Examination instruments may be used to examine the tooth or other structures during an initial oral diagnosis or after placing a restoration.
The explorer, mirror, and cotton pliers are three instruments that are basic to every dental procedure. These instruments are generally the first three instruments in sequence on most preset trays. The explorer and mirror are frequently used simultaneously during the examination of a tooth. Other examination instruments include the periodontal probe, an Expro, and articulating paper forceps.
Table 1: Classification of Hand Instruments
| Examination Instruments | |
|
Explorer |
Articulating paper forceps |
| Mirror | Probes |
| Cotton pliers | |
|
Cutting Instruments |
|
|
Angle former |
Gingival marginal trimmer |
| Chisel | Hatchet |
| Excavator | Hoe |
| Insertion/Condensing Instruments | |
|
Plastic instrument |
Condenser |
| Placement instrument | Gingival cord packer |
| Amalgam carrier | |
|
Carving Instruments |
|
| Anatomic | Smooth surface |
| Finishing and Polishing | |
|
Burnishers |
Amalgam files |
| Orangewood stick | Knives |
| Finishing strips | |
| Adjunct | |
| Thumb forceps | Pliers |
| Scissors | Spatulas |
| Dappen dishes | Matrices |
| Napkin chains | |
Explorer
An explorer is used to detect irregularities in the tooth or restorative surface, detect calculus or other anomalies during a scaling procedure, and aid in detecting carious lesions in the tooth surface. This instrument is most commonly a DE instrument, but it is also supplied as an SE instrument. The working ends of this instrument may be tapered, right angled, shaped like a shepherd's hook or a cow's horn, or may be any combination of these various shapes. The variations in shape aid the operator in gaining access to the various areas of the mouth. Each operator will have favorite explorers for various procedures, and the dental assistant should become familiar with the application of the various explorers that operator may use. Fig. 1 illustrates several varieties of explorers. It is common today to find explorers with tip ends that are made of graphite for use with resin materials. The use of graphite eliminates marring or discoloring the restoration.
Mirror
The mouth mirror is used to provide indirect vision; to provide indirect illumination to improve vision in the posterior of the mouth; and to retract the cheek, lip, tongue (Fig. 2). Dental mirrors come in a variety of sizes ranging from 5/8 inch to 2 inches (Fig. 3).
Mirrors are provided in disposable styles, single or double sided, and are either flat surface, concave (providing magnification), or front surface, which has a reflecting surface on the front of the lens rather than on the back to eliminate ghostlike images. Nondisposable mirrors come with attached or cone socket handles.
Tissue/Cotton Pliers or Forceps
Tissue forceps or cotton pliers are used to hold onto materials when transporting them from one place to another. Three types of pliers common to operative dentistry include the cotton or dressing pliers, articulating paper forceps, and thumb forceps (Fig. 4). The first two forceps are used intraorally, whereas the thumb forceps is used extraorally.
The standard cotton pliers or dressing pliers are used to transport materials into and out of the oral cavity. These instruments are used frequently during a cavity preparation to dry the cavity with cotton pellets, to transport medication on a cotton pellet to the preparation, or to carry other materials to the site. These pliers are supplied with serrated or smooth beaks, with or without a groove in the beak, and with plain or locking handles. The tips may be monangled or binangled.
Click here to view Figures 1 - 4.
Charting Oral Conditions
The charting of oral conditions is a form of dental shorthand. A variety of symbols (Table 2) and abbreviations (Table 3) are used to indicate specific conditions that exist on the teeth and on the supporting structures of the mouth. The use of symbols makes it easy to look at a dental chart and to identify easily conditions that exist in the mouth, without reading a detailed narrative.
Table 3 lists symbols that are commonly used for variety of conditions that exist in a patient's mouth. In some areas alternative suggestions have been made, since there are many options. This table represents commonly used symbols; however, each dental specialty area may have symbols that are unique to the specialty. Some dentists may use symbols that work effectively for them while other dentists may prefer the use of color (e.g., yellow for gold, blue for amalgam, red for composite) to denote different types of restorations. No particular system is right or wrong; however, charting symbols need to be identified and used consistently by all members of the staff within the office.
Table 3: Suggested Charting Abbreviations
| Abbreviation | Term | Abbreviation | Term |
|
@ |
at |
FH |
Family history |
|
a, am, ag |
Amalgam |
FLD |
Full lower denture |
|
amp |
Ampule |
FMS |
Full mouth series |
|
amt |
Amount |
FMX |
Full mouth x-ray |
|
anes |
Anesthesia |
FR or Frac |
Fracture |
|
appl |
Applicable, application, appliance |
frag frec |
Fragment Frequent, frequency |
|
approx |
Approximate |
FUD |
Full upper denture |
|
BF |
Bone fragment |
G |
Gold |
|
BP |
Blood pressure |
GF |
Gold foil |
|
Br |
Bridge |
Gl |
Gold inlay |
|
BW |
Bite-wing radiograph |
ging |
Gingiva, gingivectomy |
|
Bx |
Biopsy |
HBP |
High blood pressure |
|
C |
Composite |
Hx |
History |
|
carbo |
Carbocaine |
I & D |
Incision and drainage |
|
caps |
Capsules |
IA |
Incurred accidentally |
|
cav |
Cavity |
IH |
Infectious hepatitis |
|
CC |
Chief complaint |
IM |
Intramuscular |
|
CM |
Cast metal |
imp |
Impression |
|
cond |
Condition |
IMP |
Impacted |
|
CSX |
Complete series x-rays |
inj |
Injection, injury |
|
cur |
Curettage |
inop |
Inoperable, inoperative |
|
CV |
Cardiovascular |
IV |
Intravenous |
|
CVA |
Cerebrovascular accident |
lab |
Laboratory |
|
D or DV |
Devital |
lac |
Laceration |
|
dbl |
Double |
lat |
Lateral |
|
DEF |
Defective |
ling |
Lingual |
|
Dg or Dx |
Diagnosis |
liq |
Liquid |
|
DM |
Diagnostic models |
LLQ |
Lower left quadrant |
|
DMF |
Decayed, missing, and filled |
LN |
Lymph node |
|
DO |
Distoocclusal |
LRQ |
Lower right quadrant |
|
DOB |
Date of birth |
M, mes |
Mesial |
|
DR. |
Doctor |
mand |
Mandibular |
|
EMT |
Emergency medical treatment |
max MDR |
Maximum, maxillary
Minimum daily requirement |
|
est |
Estimate, estimation |
med |
Medicine, medial |
|
evac |
Evacuate, evacuation |
mg, mgm |
Milligram |
|
eval |
Evaluate, evaluation |
MO |
Mesioocclusal |
|
ext |
Extract, external Fasting blood sugar |
MOD |
Mesioocclusodistal |
| FBS | Fasting blood sugar | mo | Month |
| MS |
Multiple sclerosis |
TAT |
Tablet |
|
narc |
Narcotic |
TB |
Tetanus antitoxin |
|
nc |
No change, no charge |
TBI |
Tuberculosis |
|
NCP |
Not clinically present |
temp |
Toothbrush instructions |
|
neg |
Negative |
TLC |
Temperature |
|
norm |
Normal |
TPR |
Tender loving care |
|
occ, occl |
Occlusal |
TMJ |
Temperature, pulse, respiration |
|
OH |
Oral hygiene |
Tr.P |
Temporomandibular joint |
|
OHI |
Oral hygiene instructions |
URI |
Treatment plan |
|
opp |
Opposite |
ULQ |
Upper respiratory infection |
|
p |
Pulse |
URQ |
Upper left quadrant |
|
PA |
Periapical |
VD |
Upper right quadrant |
|
path |
Pathology |
wh |
Venereal disease |
|
Ped |
Pediatrics |
wnd |
White |
|
PO, postop |
Postoperative |
x |
Wound |
|
preop |
Preoperative |
xyl, xylo |
Times, such as 4x = 4 times; x-ray |
|
prep |
Preparation, prepare for treatment |
YOB YR |
Xylocaine
Year of birth |
|
prog |
Prognosis |
- | - |
|
Px, Pro, Proph |
Prophylaxis |
- | - |
|
R |
Respiration |
- | - |
|
Rx, RX |
Take (thou) recipe |
- | - |
|
RC |
Root canal |
- | - |
|
req |
Requisition |
- | - |
|
resp |
Respiration |
- | - |
|
RHD |
Rheumatic heart disease |
- | - |
|
ROA |
Received on account |
- | - |
|
SBE |
Subacute bacterial endocarditis |
- | - |
|
sig |
Write on label |
- | - |
|
sol |
Solution |
- | - |
|
stat |
Immediately | - | - |
|
stim |
Stimulate, stimulator | - | - |
|
surg |
Surgery, surgeon | - | - |
|
SX |
Symptom | - | - |
|
T |
Temperature | - | - |
| tab |
- |
- | - |
Extraoral Examination
The extraoral examination observes for asymmetry, lesions, swellings, or discoloration. Data collection begins at this point. It is an important task that requires good listening skills, attention to detail, and a high degree of accuracy. Portions of this examination may be performed by the dental assistant in some states. Regardless of who collects the data, the collection and record must be thorough and accurate.
Data that are collected during this phase of the examination are obtained by observation or palpation. Observation is a visual inspection; it is the act of noting size, shape or contour, and color of tissues. Palpation is to use the sense of touch to denote consistency, whether the tissue is soft, firm, hard, or nodular, and to denote tenderness in tissues when they are palpated.
To palpate external tissues, the operator's fingers will be used on the outer
surfaces of the face and neck or one or two fingers may be placed on the inside of
the oral cavity, depressing on a finger that is held in an opposing position outside
the mouth. Palpation is a gentle but firm tactile pressure.
Conducting an Extraoral Examination
1. Observe facial symmetry (Fig.5-A) Irregularities, such as drooping eyelids or lips, may be associated with some form of weakness in the musculature or other systemic conditions. For instance, prominence of the eyeballs and an enlarge- ment in the neck may indicate that the patient has a severe thyroid condition; a cyst, such as the branchial facial arch cyst, may be causing the asymmetry in the Fig. 5-B.
2. Inspect the skin of the face and neck. Note any lesions, swellings, or discolora- tion (Fig. 5-C). Presence of jaundice, a yellowness of the skin, may be a sign of liver disease or the retention of broken down red blood cells. These condi- tions can contraindicate the use of some drugs. Severe bruises about the head and face area may indicate abuse. The dental professional is required to assume a legal and ethical responsibility for reporting observations of abuse.
3. Inspect the nails. This can be done in comparison with the operator's nails (if those are healthy) to distinguish the difference. Bluish color of a nail bed may indicate a chronic or acute problem with circulation, while pallor may indicate anemia. Rounded clubbing of the fingers may also indicate the presence of systemic diseases. A close observation of the nails may indicate lesions caused by nail biting habits.
4. Observe the hands. The creases in a healthy person's hands retain a normal pigmentation. The vascular bed is close to the surface in the hands and the lack of hemoglobin is evidenced by a lighter color.
5. Examine the lymph nodes. Criteria for this examination include size and shape. Most nodes are approximately the size and shape of a kidney bean; mobility: lymph modes are mobile; single or multiple: most nodes are commonly found singly and even in groups they can be identified as separate entities; when the nodes are multiple or coalesced, it is a sign of a disease process; tenderness is a sign that an inflammatory process has invaded and produced tenderness.
Begin in the submental area, and, with fingers opposing each other, try to trap the lymph node against muscular or connective tissue near the bone or between the fingers (Fig. 5-D). Then proceed to the submandibular: (Fig. 5-E) and the carotid region (Fig. 5-F). When the nodes are examined in the parotid region, the parotid should not be prominent. The preauricular nodes are above the parotid region but are not accessible to palpation. Have the patient turn so that access can be made to examine the nodes in the jugular chain along the sternocleido-mastoides muscle (See Fig 5-G). Run a finger along the side of the muscle to examine these nodes. Examination of the lymphatic system in the head and neck area is important because the vessels of the oral cavity and face drain through these areas, and any evidence of swelling or tenderness in this area may indicate an infection or the presence of a tumor.
6. Examine the TMJ. Place a finger tip anterior to the tragus of each ear and ask the patient to open wide. Any tenderness, popping, clicking, or other abnormal- ity in the opening, such as excessive lateral movement, should be noted. These symptoms may indicate problems with the patient's occlusion or TMJ (Fig. 5-H).
Intraoral Examination
The intraoral examination is divided into three phases: the soft oral tissues; the periodontium; and the teeth and their occlusal relationship. As with the extraoral examination both visual inspection and palpation are used in this examination. Once again, when intraoral tissues are inspected, the visual emphasis should be on size, shape or contour, and color; palpation should identify the consistency and the tenderness of tissue. Several factors should be considered when intraoral tissues are examined; these are listed below.
At this point in the procedure the patient should be placed into a supine position. The preset tray for this procedure provides the basic instruments for all phases of the intraoral examination.
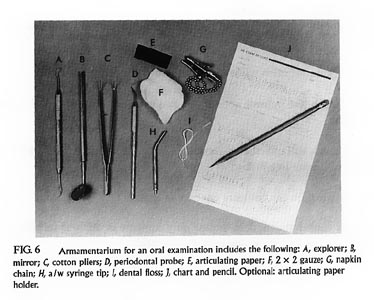
Armamentarium includes the following (Fig. 6):
| Explorer | |
| Mirror | |
| Cotton pliers | |
| Periodontal probe | |
| Articulating paper | |
| 2 x 2 Gauze | |
| Napkin/napkin chain | |
| a/w Syringe tip | |
| Articulating paper forceps, optional | |
| Dental floss or tape | |
| Patient's chart or examination sheet | |
| Pencils, lead and colored (optional) |
Intraoral Tissue Examination
| Tissue integrity of covering tissues; the epithelium over the surface should be intact. | |
| Degree of keratinization will vary in different parts of the oral cavity. | |
| Sense of touch will indicate consistency and whether tissue is soft, firm, hard, or nodular. | |
| Sense of touch will indicate tenderness; if a mass is found, if it is mobile or if it is fixed to surrounding tissue. | |
| Bilateral palpation can compare one part to another. | |
| Anatomic consideration; does the anatomy compare or differ to its bilateral
counterpart and does it deviate from the normal?
|
Soft Tissue Examination
The first phase of the intraoral examination begins with examination of soft
tissues. The dental mirror may be used to improve vision or for retraction, while the
operator performs the following:
A typical charting of the soft tissue examination would be recorded on the patient's examination sheet.
Periodontium Examination
This phase of the oral examination includes assessment of the tissues that support the teeth: the gingivae, cementum, periodontal ligament, and the alveolar and supporting bone. The alveolar and supporting bone evaluation requires the use of dental radiographs, while the other tissues are evaluated visually and with the use of a periodontal probe and mirror. The operator will use a variety of terms to describe the conditions of periodontium and accumulations of accretions. The assistant should be familiar with descriptive terms that are used to identify the location, severity, color, shape or form of the periodontium. Table 4 lists key turns that are commonly used to describe these conditions. Additionally, the dental assistant should have an awareness of the clinical characteristics of healthy and unhealthy gingival tissues.
Table 4 provides an overview of the most common clinical characteristics of the gingival tissues. Fig. 8 depicts several shapes and forms of the periodontium. During the periodontal examination the following findings are recorded in the patient's chart:
1. General health of the gingivae and notation of any signs of inflammation
2. Location and amount of plaque and calculus
3. Lack of attached gingiva
4. Presence and depth of periodontal pockets
5. Presence of furcation involvement, where pockets exist in multirooted teeth
6. Mobility of teeth
7. Position of teeth
8. Effect of existing restorations on gingival health
The periodontal probe and mouth mirror are the primary instruments that are used in this phase of the examination. The mouth mirror is used for indirect vision, illumination, and retraction, while the probe aids in determining the presence of periodontal pockets or furcation involvement. Data from this examination are recorded during each of the phases of the examination.
Table 4: Terms Commonly Used to Describe Conditions of the Periodontium
Localized
Generalized
Slight
Moderate
Severe
Bulbous
Blunted
Cratered
Normal, healthy
Soft, spongy
Stippled
Bleeding
Recession
Cleft
Term
Meaning
The condition is confined to one area, to one tooth, or to a small segment
of teeth
Evident throughout most or all of the mouth
Beginning evidence or early states of the condition
Significant amount of progression, but not to the advanced stage
Most advanced stage
Enlarged, swollen, and rounded
Receded, not sharp, rounded
Crater-like depression in the center of the papillae
Tissues are dense and fibrous; In Caucasians the tissue will be uniformly
pale pink; areas of pigmentation, from light to dark brown, may occur in
various skin colors or races
Tissues are swollen and contain fluid
Tissues contain many tiny indentations, a healthy condition
When gently probed, tissues bleed
Margin of gingiva located apical to the CEJ
Narrow slit-like recession that occurs where margin tissue is destroyed
Red
This is erythema and indicates early or acute inflammation
Bluish purple
This is cyanosis and indicates an inflammation of chronic,
well-established nature
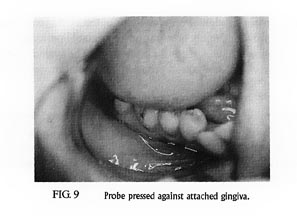
Observing Gingival Health
1. Visually observe the buccal gingiva by retracting the cheek with the mirror. Note changes in color, form, and texture throughout the segment.
2. Use the periodontal probe to gently press against the attached gingiva (Fig. 9), the gingival margin, and the interdental papilla to determine the firmness of the tissue.
3. Probe the interdental papilla area to identify the presence of inflammation or bleeding.
4. At sites of gingival recession, measure the depth of the recession from the gingival margin to the CEJ.
Continue this process around other segments of the mouth. Findings from this phase of the examination would be recorded on the patient's record.
Probing the Periodontium
The periodontal probe measures the depth of the gingival sulcus or periodontal pockets (Fig. 10). Various types of probes are available. The working end of each of these probes is calibrated in millimeters to facilitate in reading depth measurements. Periodontal probes are available with varying millimeter readings: 3, 6, 9, and 12 mm; l, 2, 3, 5, 7, 8, 9, 10 mm; and 3, 6, 8 mm, or the probes are noncalibrated, as in a probe that is specifically designed for examinations of furcations. Probes are also available with alternate colored bands to designate depth. Some operators prefer the color-coded probe for increased visibility.
Measurements are recorded at six points tooth_three from the buccal
(distobuccal, buccal, and (mesiobuccal) and three from the lingual surface (distolingual,
lingual, and mesiolingual) as shown in Fig. 11. The assistant records these data as
the operator probes the periodontium to identify the presence of periodontal
pockets. The operator actually walks the probe around the tooth, beginning at
the distobuccal area and continuing around to the mesiobuccal area (Fig. 12).
The measurements for each area are recorded (Fig. 13) in numeric form or in
graphic form. This procedure is continued around the arch on the buccal aspect, and
then the operator transfers to the lingual aspect before proceeding to the opposite
arch. A heathy periodontium is one that can be probed at 2 to 3 mm. In most cases
only measurements that deviate from the normal are recorded.
An alternative to manual periodontal probing is the automated system shown
in Fig. 14. This system provides highly accurate and repeatable periodontal
measurements by using a probe with constant pressure. The system requires
only a single operator and records, stores, and prints a periodontal examination
automatically.
During periodontal probing the operator may encounter bleeding, sensitivity, calculus, or saliva. Therefore the assistant must observe the probing sites regularly and use the HVE tip as needed to remove fluids and debris. Frequently the operator may request that a specific site be dried thoroughly with air to improve visibility or to gain access to the gingival sulcus.
Click here to view Figures 10 - 12.
Click here to view Figures 13 - 14.
Probing the Furcation
When a periodontal pocket extends apically and severe bone loss occurs in multirooted teeth, often the furcation area becomes involved. Examination of the furcation is necessary to determine the degree of involvement. The straight periodontal probe, a special furcation probe, or even a curet scaler can be used to determine if bone still fills the area between the roots. A furcation is charted as shown in the table of symbols.
Determining Mobility
Bone loss from periodontal disease can create tooth mobility as a result of progressive loss of the periodontal attachment. The operator will determine the degree of mobility by exerting force in a buccal-lingual direction. Each tooth is tested in a systematic method, generally beginning in the maxillary right quadrant, proceeding to maxillary left quadrant, from there to the mandibular and concluding on the mandibular right. Mobility is charted as shown in the table of symbols and may be classified as the following:
| + mobility | Movement that is barely discernible |
| I mobility | Movement from buccal to lingual totaling 1 mm |
| II mobility | Movement from buccal to lingual totaling 2 mm |
| III mobility | Movement from buccal to lingual totaling 3 mm |
Teeth
Much information needs to be recorded about the teeth. The symbols described in the table are especially helpful in this phase of the examination. All existing restorations, missing teeth, malpositioned teeth, dental caries, or other anomalies that exist on the teeth are recorded at this time. The operator may dictate the information, while the assistant records it on an examination sheet. The operator uses the mirror and explorer for this phase of the examination. The explorer aids in probing and examining all surfaces of the teeth. At this point the assistant may change from a lead pencil to a colored pencil if the office uses a color-coding system to denote different restorations. Note these pencils may be packaged and sterilized and should receive the same infection control care at the end of the procedure as other instruments receive.
The operator will typically begin in the maxillary right or left tuberosity area and progress to the tuberosity area on the opposite side of the arch, describing any abnormalities as each tooth is examined. The operator then drops down to the mandibular arch and continues examining around to the opposite side of the mouth. For instance, conditions illustrated in Fig. 15-A, might be described in the following manner:
#1 is missing
#2 has mesioocclusal caries
Food impaction between #3 and #4
Diastema between #8 and #9
#9 has mesial caries
#12 is rotated distally
#13 is missing
#14 is shifted mesially
#15 is partially erupted
#17 needs to be extracted
#18 has a beginning furcation
#19 has furcation involvement
#20 has a defective distoocclusal amalgam
#23 has mesiofacial caries
Between #26 and #27, there is an open contact
#28 is hypersensitive
#31 has cervical buccal caries
#32 is hypererupted
The three charts in Fig. 15, B through D, show examples of oral examinations that were completed for three different patients who had a variety of oral conditions. The codes used in these charting exercises are from Table 3.
Occlusion
The manner in which the maxillary and mandibular teeth contact is referred to as occlusion. The relationship of the two arches as they occlude (close together) is included as part of the oral examination. The operator evaluates how the patient opens, closes, and laterally moves the arches to determine if any abnormalities exist. Factors that affect proper occlusion include the relationship and size of the arches to each other; premature contact; teeth that are rotated, hypererupted, unerupted or crowded; occlusal relationships, including crossbite, overjet or overbite. Such abnormalities can cause damage to the periodontium or the temporomandibular joint, or they can create increased wear patterns on the teeth.
Examining the Occlusion
The operator asks the patient to gently close the arches together, and the patient brings the dental arches together in a normal position: centric position. Often, when a patient is directed to close in centric or normal position, he or she may find it difficult to close in this position or may want to bring the anterior teeth together in an end-to-end relationship. The operator may need to ask the patient to relax and bite on the back teeth. The operator may have observed the patient's occlusion earlier in the examination, so there will be an awareness of the proper occlusion before it is checked.
Articulating paper or marking paper is placed between the arches, and the patient is directed to bite down and slide from side to side. This action marks the surfaces of the teeth that are in improper articulation or gives evidence of interference that could cause occlusal trauma.
Through examination the operator determines whether the patient has normal; Class I; Class II, Division 1 or 2; or Class III occlusion. The clinical examination is combined with photographs, radiographs, and study models to determine the patient's occlusion. Any deviations from normal occlusion may prompt the operator to refer the patient to an orthodontist for further examination and consultation.
Figure 15B - Screen Resolution
Figure 15C - Screen Resolution
Figure 15D - Screen Resolution
Radiographic Examination
The radiographic examination is a common reliable diagnostic aid for evaluating the tissues in a patient's mouth, especially those tissues not visible to the naked eye. The intraoral examination is effective in determining anomalies and carious lesions in areas visible to direct examination. The visual and tactile examination used to detect caries is adequate in most areas, but in areas of limited access, particularly the interproximal surfaces of the teeth, the quality of such an examination is restricted by the close contact points of the teeth.
In a radiographic examination, the use of bitewing radiographs aids in diagnosing interproximal caries and determining the level of the bone, the periapical radiograph illustrates the entire tooth and its support tissues, while extraoral radiography provides the dentist a view of the teeth in relationship to other head and neck anatomy.
Interpretation
The interpretation of radiographs for the purpose of diagnosing requires a thorough understanding of radiographic anatomy found on bitewing, periapical, occlusal and extraoral radiographic films. The ability to determine normal from abnormal structures is necessary when radiographs are evaluated. Knowledge of the type, location, size, and radiographic image of each structure is important when normal anatomic landmarks and abnormal structures are viewed and evaluated.
Dental radiographs used in conjunction with the thorough intraoral examination allow the dentist to complete the examination.
Although it is the responsibility of the dentist to diagnose, it is vital for the assistant and hygienist to realize importance of their roles in the radiographic examination. The auxiliaries will be responsible for producing the radiographs. Consequently, a thorough knowledge of proper radiographic techniques, necessary anatomic detail, and proper processing techniques is vital to the success of creating a diagnostically acceptable set of radiographs.
Pediatric Oral Examination
The examination of the oral cavity that is performed for a child is no different from that for an adult. Similar conditions, such as gingivitis, abnormal growths, and carious activity, found in the oral cavity of an adult may be discovered in a child. What may be different is the approach the dentist takes and the clinical examination chart that is used. Examination charts that are commonly used in pediatric dental offices are designed to be able to chart primary and secondary dentition (Fig. 16). Any of the common tooth numbering systems discussed in the oral anatomy chapter are practiced in a pediatric examination.
Stop and Think
At the end of the procedure
1. Are the appropriate universal barrier techniques observed?
2. Have all the appropriate surfaces been cleaned and disinfected?
3. Has all armamentarium been removed?
4. Has all the equipment been repositioned?
5. Has all the equipment been disinfected or sterilized according to OSHA guidelines?
![]()
Source: Finkbeiner BL, Johnson CS: Comprehensive Dental Assisting, St. Louis, 1995, Mosby. Reprinted with permission.