 |
 |
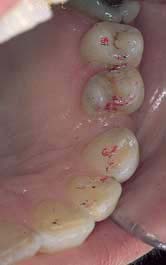
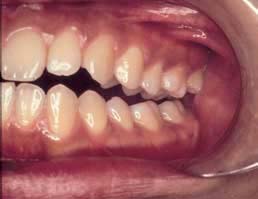
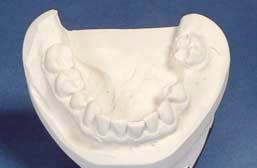
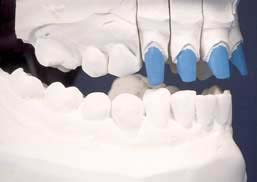
| Fig. 1a Teeth touching in CO | Fig. 1b Premature contact in CR |
 |
 |
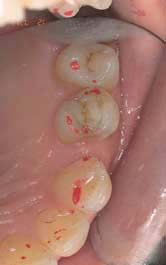
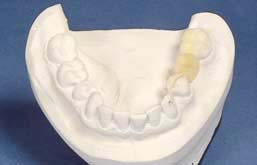
| Fig. 2a Left lateral excursion | Fig. 2b Non working side interference during left lateral excursion |
| Contents | Previous | Post-Test |
S. J. Davies,1 R. M. J. Gray,2 and P. W. Smith,3
Many theories and philosophies of occlusion have been developed.1–12 The difficulty in scientifically validating the various approaches to providing an occlusion is that an ‘occlusion’ can only be judged against the reaction it may or may not produce in a tissue system (eg dental, alveolar, periodontal or articulatory). Because of this, the various theories and philosophies are essentially untested and so lack the scientific validity necessary to make them ‘rules’. Often authors will present their own firmly held opinions as ‘rules’. This does not mean that these approaches are to be ignored; they are, after all, the distillation of the clinical experience of many different operators over many years. But they are empirical. In developing these guidelines the authors have unashamedly drawn on this body of perceived wisdom, but we would also like to involve and challenge the reader by asking basic questions, and by applying a common sense approach to a subject that can be submerged under a sea of dictate and dogma.
In this part, we will discuss:
1*GDP, 73 Buxton Rd, High Lane, Stockport SK6 8DR; P/T Lecturer in Dental Practice, University Dental Hospital of Manchester, Higher Cambridge Street, Manchester M15 6FH
2Honorary Fellow, University Dental Hospital of Manchester, Higher Cambridge Street, Manchester M15 6FH
3Lecturer/Honorary Consultant in Restorative Dentistry, University Dental Hospital of Manchester M15 6FH
*Correspondence to : Stephen Davies
email: stephen.j.davies@man.ac.uk
REFEREED PAPER
© British Dental Journal
2001; 191: 365–381
It is easy to justify a chapter on restorative dentistry in a book on occlusion. Dentists are constantly involved in the management of their patients’ occlusion during routine restorative dental procedures. This is because the occlusal surfaces of the teeth are usually involved in the provision of restorations. The significance of this obvious statement lies both in the relationship that the occlusion has within the articulatory system and the effect that trauma from the occlusion may have on the tooth, and its periodontal support. All dentists wish to avoid these problems; in reality dentists want predictable success for their patients and themselves.
Successful occlusal management leads to: predictable fitting of restorations and prostheses, longevity and absence of iatrogenic problems, patient comfort and occlusal stability.
It is a general principle in medicine that before treatment is provided a careful clinical examination is carried out. Dentistry generally holds to this principle, but with perhaps one exemption. Most dentists were not taught at dental school to examine and record the pre-existing occlusion before providing a restoration. Instead it has become customary to provide the restoration and then to ‘check’ the occlusion afterwards. If this is our habit, we should ask ourselves the question what are we checking the occlusion of our restoration against? It cannot be the pre-existing occlusion if we did not examine it first. The principle of providing a new restoration that does not alter the patient’s occlusion is described in restorative dentistry as the ‘conformative approach’, and the vast majority of restorations are provided following this principle.
Explanation
The conformative approach is defined as the provision of restorations ‘in harmony with the existing jaw relationships’.13 In practice this means that the occlusion of the new restoration is provided in such a way that the occlusal contacts of the other teeth remain unaltered.14
Justification
The answer as to why dentists should wish to adopt this approach is often given as being ‘because it is the easiest’. In fact, this is not the case; the easiest approach is undoubtedly not to consider whether the new restoration changes the patient’s occlusion, maybe hoping not to change it too much. The reason why the conformative approach is favoured is not because it is the easiest but because it is the safest. It is less likely to introduce problems for the tooth, the periodontium, the muscles, the temporomandibular joints, the patient and the dentist.
‘Fingers crossed’ dentistry equals stress
Q: When do you use the conformative approach?
A: When ever you can
When to Use the Conformative Approach?
The short answer is to use it whenever you can. It is possible to provide a restoration to the conformative approach when:
|
|
| Fig. 1a Teeth touching in CO | Fig. 1b Premature contact in CR |
|
|
| Fig. 2a Left lateral excursion | Fig. 2b Non working side interference during left lateral excursion |
Improving the Occlusion Within the Restrictions of the Conformative Approach
Although the principle of not changing the patient’s occlusion is paramount within the conformative approach, this, of course, refers to the occlusal contacts that the patient has between their teeth that are not being presently restored. It does not mean that the new restoration should slavishly reproduce the exact occlusion that the tooth in need of restoration has. One of the purposes of restoring it would probably be lost if that was the case. How the occlusion may be improved is best considered within the principles of ‘ideal occlusion’.
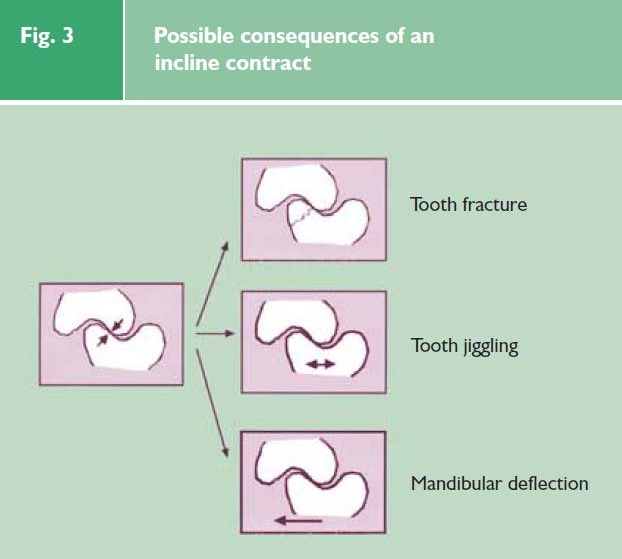
On the tooth level, ideal occlusion is described as an occlusal contact that is: ‘in line with the long axis of the tooth and simultaneous with all other occlusal contacts in the mouth’. This means the elimination of incline contacts. Incline contacts are considered to be potentially harmful, because of the lateral force that they may generate. A lateral force on a tooth may have harmful sequelae, which are illustrated in Figure 3.
|
|
So as long as the jaw relationship is the same, it is still the conformative approach. Within the conformative approach it is not only possible, but advisable to improve the occlusion of the restored tooth by the elimination of incline contacts either by careful design of the occlusal platform of the new restoration or by judicial alteration of the opposing tooth.
The acid test is whether or not the occlusal contacts of the other teeth (those which are not involved in the restoration) are changed. If the occlusal relationships of these other teeth are changed then the approach is not the conformative but the reorganised approach. This is not wrong, but requires a different approach and is described later in respect of both simple and complex restorative dentistry.
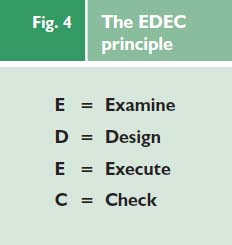
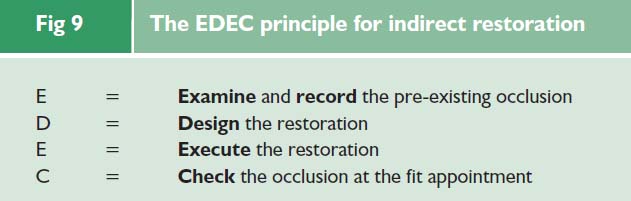
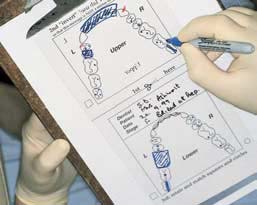
When considering the provision of simple restorative dentistry to the conformative approach, no matter what type of occlusal restoration is being provided the sequence is always the same. The ‘EDEC principle’ that is presented here (Fig. 4) is a system that the authors have devised to give a logical progression through the sequence of producing a restoration, to the conformative approach. This is capable of modification to other aspects of clinical practice.
|
|
The EDEC principle is useful in relation to:
Examine
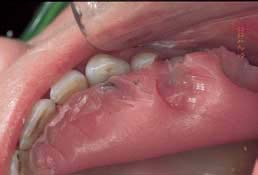
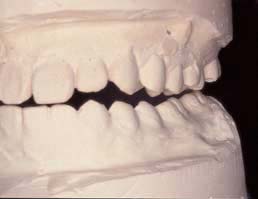
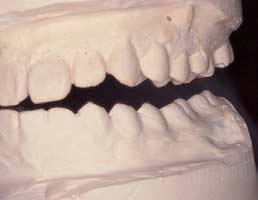
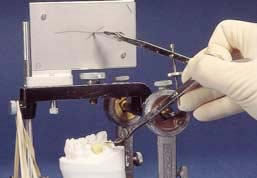
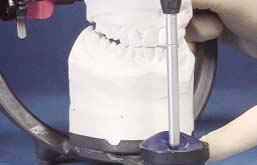
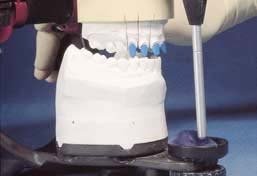
Firstly, examine the occlusion before picking up a handpiece. The examination is in two parts: the static and the dynamic occlusions. The examination of the static occlusion in centric occlusion (rather than in centric relation) is done by asking the patient to tap onto thin articulating paper or foil (Fig. 5). Next, ask the patient to slide from side-to-side using thin paper or foil of a different colour; this marks the contacts of the dynamic occlusion.
|
|
|
Fig. 5 Shot of pre-existing marks |
Design
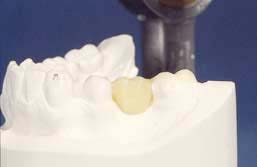
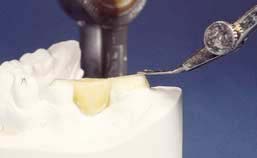
The clinician must visualise the design of the cavity preparation. This may sound pedantic to some, but it is in effect what every practising dentist does when preparing a tooth for restoration. The only difference in this sequence is that the suggestion is made that the visualisation is better done after a simple occlusal examination (Fig. 6). The existing occlusal marks will either be preserved by being avoided in the preparation, or they will be involved in the design. As established, they do not have to be exactly duplicated as it may be possible to improve them (from being ‘incline contacts’ to ‘cusp tip to fossa/marginal ridge’ relationships), or it may be possible to add an occlusal contact if the restoration being replaced was in infra occlusion.
|
|
|
Fig. 6 Close-up of tooth with pre-existing marks |
Often it will be found that the previous restoration is in infra occlusion, as every dentist is anxious to avoid the ‘high restoration’. But the avoidance of a supra-occluding restoration by deliberately providing restorations that do not contribute to the overall occlusion is not good occlusal practice.
Execution
The execution of the restoration to the design implies that the dentist will have decided the form of the preparation before starting to cut. It is our belief that this does not take any longer and that it is always easier to work to a plan even in the simplest of restorations.
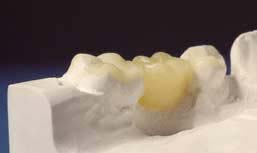
There will be an overall saving in time, especially if the first two stages are carried out whilst the local anaesthetic is working. The finishing of the restoration is also facilitated if there is a definite aim to the carving or shaping (Fig. 7).
 |
| Fig. 7 Close-up of finished restoration |
Check
Finally, we check the occlusion of the restoration does not prevent all the other teeth from touching in exactly the same way as they did before. This is either done by referring to some diagrammatic record made, or by reversing the colour of the paper or foils used pre-operatively, or from memory.
Visualise the End Before Beginning
There is no Point in the Technician Designing the Occlusal Aspect of the Restoration on Models that do not Accurately Conform to the Patient’s Occlusion
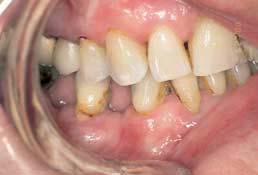
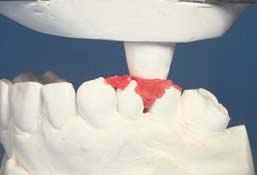
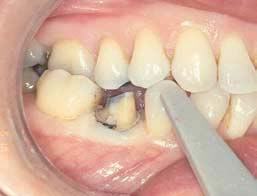
In the illustrated case it can be seen that the occulsal contact against the mesial marginal ridge of the restored UL4 (24) is slightly too heavy (Fig. 8a); this has prevented the palatal cusp of this tooth from occluding and has changed the occlusion of the canine. After minimal adjustment, this has been rectified (Fig. 8b). For simplicity of illustration, the dynamic occlusion has not been shown in this series.
 |
 |
| Fig. 8a Initial check of finished
|
Fig. 8b After adjustment restoration
|
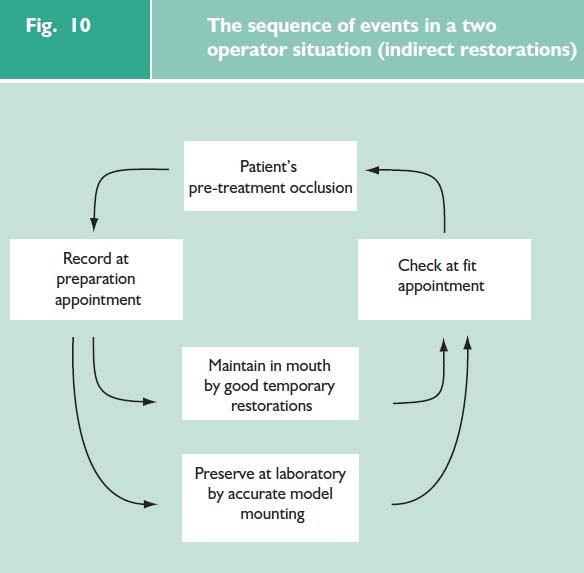
The EDEC principle is still followed for indirect restorations (Fig. 9). The essential difference between a direct and an indirect restoration is that a second operator is involved, namely the laboratory technician. We believe that it is a more accurate representation of the working relationship to consider the laboratory technician to be a second operator rather than an assistant, as it makes it clear that the technician also has expectations and responsibilities
|
|
Two operators means there are several consequences to the treatment sequence (Fig. 10). The dentist not only has to examine the occlusion but the results of that examination have to be accurately recorded and that record has to be transferred to the technician. This is the clinician’s responsibility. Secondly, the technician has the responsibility to preserve the accuracy of that record during the laboratory phase of treatment. Finally, because of the interval in treatment to allow the restoration to be made, the clinician has the responsibility to maintain the patient in the same occlusion during that interval. Consequently it is imperative that the patient is dismissed from the preparation appointment with a temporary restoration which will maintain the same relationship between the prepared tooth and the adjacent and opposing teeth (Fig. 10).
|
|
Examine
The examination of the patient’s pre-existing occlusion is carried out in exactly the same way as described for the direct restoration. There is a need for that information to be transferred accurately to the laboratory technician: a record must be made.
The provision of an indirect restoration always involves the transfer of anatomical information in the form of the impressions. It is the occlusal relationship of teeth which is the important record, because the technician cannot carry out his or her responsibilities without knowing how the upper and lower models relate to one another.
There are three ways in which this anatomical information can be transferred: two dimensional bite records, three dimensional bite records, and a combination of both.
Two Dimensional Bite Records
Photographs: It is entirely possible that as instant intra-oral photography becomes more available the clinician will be able to send the technician a photograph of the patient’s preexisting occlusion marked by occlusal registration paper or foil; so that in making the indirect restoration to the conformative approach the technician can see what the patient’s pre-existing occlusion was in the mouth (Fig. 11).
 |
| Fig. 11 Intra-oral photograph of occlusal contacts on teeth adjacent to a post crown preparation |
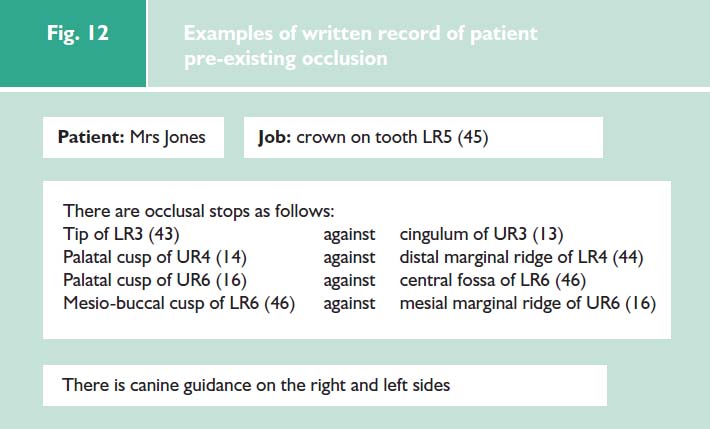
Written record: It is quick, simple but effective in some situations for the clinician to simply tell the technician what the occlusion should be when the restoration is finished (Fig. 12).
|
|
Occlusal sketching: ‘Occlusal sketching’ is a technique of recording onto an acetate sheet a sketch of the occlusal marks made in the patient’s mouth, by articulating paper or foil, of the static and dynamic occlusion. The acetate strip is designed to be viewed in two different ways: one is appropriate to the clinician treating the supine patient and the other is convenient for the technician to use on the bench in conjunction with the models. The occlusal sketch is an easy way for the clinician and the technician to check that the occlusion of the restoration conforms to the pre-existing occlusion (Fig. 13a–d).
 |
 |
| Fig. 13a A sketch is made of the patient’s occlusion (before preparation of a bridge) by the dentist at the chairside | Fig. 13b This sketch is reconfigured at the laboratory as an aid to the technician to confirm the correct mounting of the models |
 |
 |
| Fig. 13c The bridge is constructed in the laboratory to ‘conform’ with the occlusion | Fig. 13d At the fit stage, the dentist uses the sketch as an aid to check conformity between the pre- and post-operative occlusions |
Occlusal sketching is a user-friendly way of recording the patient’s occlusion. It facilitates the transfer of anatomical information between the clinician and the technician. In addition, it offers the clinician a convenient way of recording the patient’s occlusion as part of the dental records, and this may have medico-legal considerations.
Three Dimensional Bite Records
Bite registration materials: There are many different materials and they all have their pros and cons.15 Their use is not a guarantee of successful transfer of information; and it is easy to to be fooled that when one material fails to produce a good result that a different material would have succeeded. In reality it is nearly always a misunderstanding of the objective of the exercise that has resulted in an inaccurate record. No particular bite registration material guarantees success.
The objective is to record only the correct spatial relationship of the prepared tooth to its antagonists. Other teeth should contact as before.
The inadequacies of models as anatomical records of the teeth and mucosal surfaces give rise to most of the problems. Impressions often do produce models which are not completely accurate.16 An incomplete impression of an occlusal fissure or of an interdental embrasure could very likely result in a significant difference between the occlusion of the patient’s teeth and the models. As a consequence the opposing model will not have a true relationship with the working model and it will keep the ‘other teeth’ apart.
Even if the models are completely accurate and allow the bite registration material to adapt in exactly the same relationship to the models as they had to the teeth, then there is still the problem that in the mouth the mucosal surfaces are soft and compressible, whereas on the models the mucosal surfaces are replicated by hard incompressible material which will probably hold the bite registration material away from its true relationship with the models of the teeth. As a consequence the opposing model will not have a true relationship with the working model: it will keep the ‘other teeth’ apart.
For these reasons, three important guidelines emerge:
The ‘second record’ may be a second bite registration in a different material; for example if an ‘easy’ material like an elastomer has been used first, it may be wise to use a harder material (in both senses) such as acrylic resin or hard wax. Alternatively the second record may be a two dimensional one, such as occlusal sketching (Figure 13a–d).
The process by which these small corrections are made to the working models or ‘model grooming’ is discussed under the design stage of the EDEC principle.
Functionally Generated Pathway
The great advantage of this technique is that it produces a hard record of both the opposing static and dynamic occlusions in only three stages, two of which are carried out in the mouth. There is, therefore, much less room for error. The construction of a functionally generated pathway is often considered to be very difficult and a ‘special’ procedure in much the same way as the use of a facebow or rubber dam. In reality and in common with these other techniques it becomes, with practice, simple, logical and a time saver.
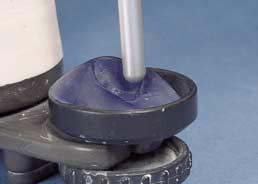
Technique: A soft, plastic material (eg tacky wax) is applied to the teeth, and the patient is asked to perform a lateral excursive movement on that side. This carves grooves into the wax which represents the movement eg ‘pathway’ of the lower teeth relative to the upper teeth. This impression is then cast in the mouth using a quick setting plaster applied with a brush. The cast can then be mounted in the laboratory, and used, in conjunction with the ‘normal’ opposing model.
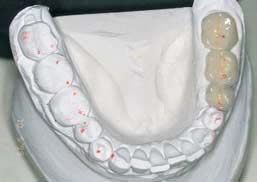
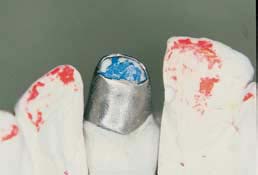
Alternatively and probably more easily, the patient is asked not only to bite together in centric occlusion (Fig. 14a and b) but also to go into excursive movements (Fig. 14c). A pattern acrylic (eg Duralay)17 can be built up on a preparation, and then the patient carves out a pathway that the opposing tooth has taken relative to the prepared tooth (Fig. 14d). This record (Fig. 15a) can thus be mounted on to the working model at the laboratory and a cast is produced of the movements of the opposing teeth (Fig. 15b and c).18
 |
 |
| Fig. 14a Patient in centric occlusion | Fig. 14b Wax record of centric occlusion |
 |
 |
| Fig. 14c Patient goes into right lateral excursion | Fig. 14d Duralay recording the pathway of the LR 5 (45) relative to upper premolars during right lateral excursion |
 |
 |
 |
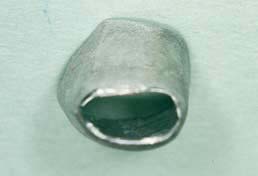
| Fig. 15a Set Duralay record of movement of LR5 (45) relative to upper premolars | Fig. 15b Twin stage articulator | Fig. 15c The Duralay record is used to cast an opposing model |
A functionally generated pathway indicates not only where the cusp tips of the opposing teeth are in centric occlusion (Fig. 15d) but also where they move relative to the proposed crown (Fig. 15e). This is a static record of the patient’s dynamic movement.
 |
 |
| Fig. 15 d Centric occlusion (static occlusion) opposing the inlay preparation of UR4 (14) | Fig. 15e The movement pathway (dynamic occlusion) of LR5 (45) cast in stone |
Dynamic Occlusion Bite Registrations
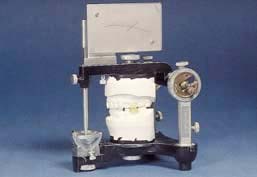
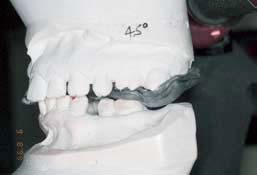
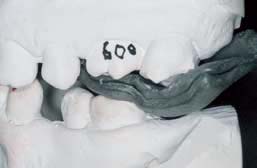
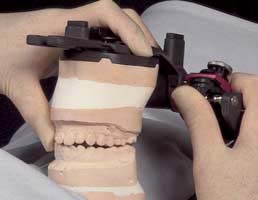
These are used to anticipate the movements of the opposing teeth during excursive movements of the mandible by enabling the condylar angle to be set in the articulator to the value comparable with the patient’s TMJ (Figs 16 and 17).
 |
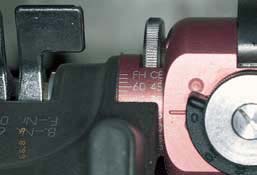 |
| Fig. 16a Wax record is correctly seated... | Fig. 16b ...indicating that the condylar angle is 45o (scale FH) Frankfurt Horizontal (KaVo Articulator) |
 |
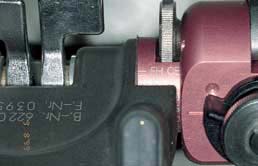 |
| Fig. 17a Wax is incorrectly seated… | Fig. 17b …because condylar angle is wrong |
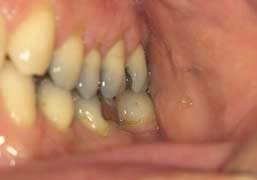
These records can be avoided, together with their inherent difficulties caused by the compressibility of even the hardest waxes, by either setting the condylar angle to a value that allows some cuspal morphology in the restoration (say 25 degrees) or by setting the condylar angles by simple observation of the space or lack of it between the patient’s molars on the non working side (Figure 18a–e).
 |
 |
 |
| Fig. 18a Gap between patient’s back teeth, during a right lateral excursion | Fig. 18c ...gap on the NWS is the same as in the mouth (see Fig. 18a) |
Fig. 18b Condylar angle is adjusted until... |
 |
 |
| Fig. 18e ...created too big a gap | Fig. 18d Too steep a condylar angle... |
Clinically the cavity preparation is occlusally designed in exactly the same way as for a direct restoration. The fundamental differences are that firstly the technician is going to make the restoration and secondly that, dependent on the material to be used, there will be certain requirements especially with regard to sufficient clearance between the top of the preparation and the opposing teeth (Fig. 19).
 |
| Fig. 19 Photograph of flexible thickness gauge |
If, because of clinical considerations (eg nearness of the pulp) the clinician suspects that the technician may not have sufficient room, for say an adequate thickness of porcelain in a metal ceramic crown, then it is much better to give the technician permission to reduce the height of the opposing tooth than to risk a high crown. It is essential in this situation, to advise the patient atthe preparation appointment that adjustment to the opposing tooth may be necessary next time, giving reasons. Alternatively, after discussions between dentist and technician, it may be decided that the best course of action would be to further reduce the height of the preparation. In this circumstance this can be done simply by the use of a coloured separator medium on the die, or very accurately by the use of a transfer coping with an open top made to fit the adjusted height of the preparation (Figs 20a,b).
 |
 |
| Fig. 20a Transfer coping on die after technician has reduced the height of the core | Fig. 20b Transfer coping ready to use in the mouth prior to fit of crown |
Model grooming is the title given to the process of adjusting the models so that they more accurately reflect the occlusal contacts that the patient has in their real dentition. Implicit in the use of the word ‘grooming’ is understanding that these are small not gross adjustments to the occlusal surfaces of the plaster models.
The critics of model grooming have two objections, namely that it should not be necessary and that as soon as the technician or dentist scratches those models, they are not a completely accurate representation of patient’s teeth.
Objection No. 1: It Should not be Necessary.
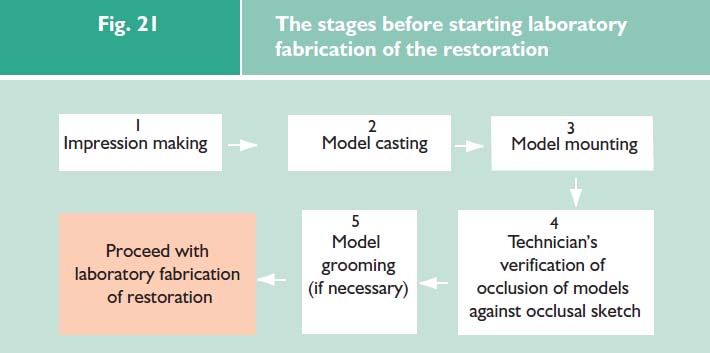
This objection is quite correct; if the impression, casting and mounted processes have been performed entirely without any error, then the models will exactly duplicate the patient’s teeth and the occlusal contacts that the teeth make. Whereas everybody involved in this process of anatomical information transfer should strive for this perfect replication, it is the authors’ view that nobody achieves this high goal every time. So it follows that whereas model grooming should not be necessary, model checking is always necessary. This means that, before the models and the relationship between them can be accepted as accurate then some process of verification should be employed (stage 4, Fig. 21). This could even involve recalling the patient, but much more conveniently, some form of second ‘check bite’ can be used. This may be either two or three dimensional as already described.
|
|
There is a world of difference between deciding to ignore something and being ignorant of it
If at this verification an error is detected, then the clinician has three choices: do all or part of the process again, engage in model grooming, or proceed with fabrication of the restoration having decided to ignore the error.
Which option is chosen should depend the circumstances of the case; the first and last have definite drawbacks. Which is best depends upon many factors including the size of the error. If the error is gross, repeating the process may be the only option; it will be inconvenient to the technician, clinician and patient. However, it will take less time than having to remake the restoration.
If the error is small then model grooming is a good option. However, to deliberately ignore the inaccuracy is not a sin; it is simply an admission that the restoration delivered by the laboratory is not going to be as accurate as it could be. Some of the predictability, therefore, has gone, so the expectation of adjustment at the fit stage has increased. In the ‘real world’, clinicians are constantly having to make compromises; in fact, the skill of a clinician might be judged by their ability to choose and manage compromise.
The clinician who decides to ignore an error at the verification stage, has made a conscious decision to reduce the level of predictable success and is committed to making the adjustments to the occlusal surface of the restoration at the fit stage. The clinician who is ignorant of an error is in uncharted waters and may not even care whether he gets the patient safely into port. It is emphasised that this model verification stage only involves providing the technician with a second occlusal record; this can be a two dimensional record (eg occlusal sketch).
Objection No. 2: If Models are ‘Groomed’, then they are not Accurate.
This is also true, but if the models are not accurate, the process of grooming is designed to reduce the inaccuracy. As far as the design of the occlusal surfaces of a laboratory-made restoration are concerned the only parts of the models that matter are the occlusal surfaces of the other teeth. In fact the only parts that really matter are the occlusal contacts that those teeth make in static and dynamic occlusion. Anybody who doubts this could try the experiment of taking some totally accurate models and drilling holes through the teeth to make them look like Emmental cheese but avoiding the occlusal surfaces. The models would no longer be an accurate three dimensional representation of the patient’s teeth but you could still make an accurate restoration on them: only the occlusal surfaces matter.
Model grooming
Model grooming adjusts the occlusal surfaces of the models so that they make the same contacts as the patient’s teeth do. It is part of the ‘(relevant) anatomy replication’ process.
Execute: From an occlusal point of view one of the most significant considerations is the provision of a temporary restoration which duplicates the patient’s occlusion and is going to maintain it for the duration of the laboratory phase. For this the temporary restoration should: be a good fit, so that it is not going to move on the tooth; provide the correct occlusion, so that the prepared tooth maintains its relationships; be in the same spatial relationship with adjacent and opposing teeth. By far the easiest way of achieving these aims is to make a custom temporary crown. With a little preparation, custom temporary crowns can be made quite quickly. Figures 22a–d show the preservation of the patient’s pre-existing occlusion (Fig. 22a) through the temporisation, laboratory and cementation phases.
 |
 |
| Fig. 22a Prepared tooth with occlusal marks on adjacent teeth | Fig. 22a Prepared tooth with occlusal marks on adjacent teeth |
 |
 |
| Fig. 22c Final crown on articulator with static occlusion marked | Fig. 22d Final crown in mouth with static occlusion marked |
Check: The occlusion of the restoration should be as ideal as possible (preferably not on an incline) and should not prevent all the other teeth from touching in exactly the same way as they did before. This needs to be checked before and after cementation. Cementation is the last chance we have to get it wrong! If it is a posterior restoration then it is unlikely to be ideal if there is any occlusal contact during lateral or protrusive excursion. Ask the patient to slide their teeth using one colour of articulating paper or foil, and then tap their teeth using a different colour.
The rationale and procedure for restoring a patient to the ‘reorganised approach’ will be, more appropriately, given in the section: ‘Good Occlusal Practice in Advanced Restorative Dentistry’.
In that section, we will be considering the treatment of a patient when the treatment of their dental needs means that it will be impossible to keep the same occlusion and so the jaw relationship which that occlusion dictates. In that scenario, because inevitably the patient is going to have a different jaw relationship after dental treatment, it is the responsibility of the clinician to ensure that the new occlusion is more, rather than less, ideal in relation to the rest of the articulatory system.
As stated earlier, an occlusal contact that guides the mandible into the jaw relationship is known as a deflecting contact. Some restorative authorities advise that teeth that are not directly involved in the restoration (tooth to be restored and its opposing tooth) can be altered to improve the occlusion, within the ‘conformative approach’. We agree that is an attractive idea to try to improve the occlusion of the surrounding teeth, by say removing the incline contacts. The difficulty is to be sure that one is not changing deflecting contacts, because if they are being altered then jaw relationships are being changed. This, then, is not the conformative approach. The objective is now the provision of an ideal occlusion (Fig. 23). For this to be successfully achieved, detailed planning and usually multiple changes in occlusal contacts are needed.
|
|
The important limitation of the conformative approach is that none of the teeth to be prepared or adjusted can be deflecting contacts, because if they are then as a consequence of changing them the jaw relationship will probably be changed. If modification to these deflecting contact teeth is envisaged, this then becomes a reorganised approach no matter how few teeth are being restored. This, as will be seen in the next section, is a much more complex procedure.
It can thus be a difficult decision as to ‘when to stop’ adjustment of the teeth not directly involved in a restoration that is being carried out under the conformative approach.
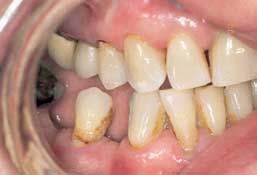
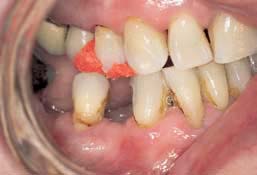
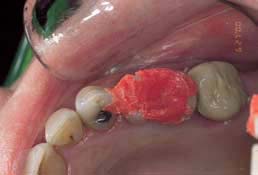
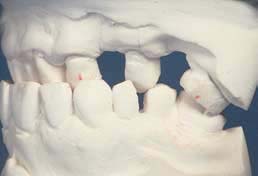
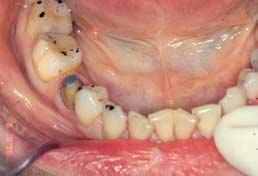
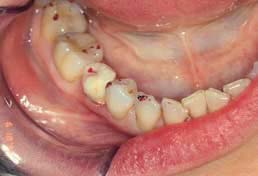
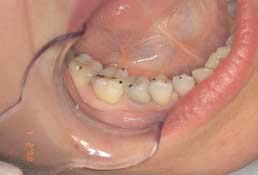
The new restorations at UL6 and UL7 (26, 27) were being provided within the ‘conformative approach’. During the finishing, the occlusal contacts of these restorations are too high (Fig. 24a) because the original contacts on UL4 and UL5 are not evident. After this has been achieved (Fig. 24b), there is an opportunity to ‘improve’ the occlusal contact against the distal part of UL5 (25). This would involve changing it from contacts on the cuspal inclines either side of the marginal ridge to a more ‘ideal’ single contact on the flat part of the ridge. Although a case could be made for doing so, there is no Figure 24c showing this completed because the clinician decided against it, preferring to leave the occlusal contact at the UL5 (25) exactly as it was before treatment of the teeth distal to it. There would have been a stronger case for adjustment if there had been a single incline contact.
 |
 |
| Fig. 24a New restorations are too high | Fig. 24b After adjustment of new restorations, occlusion of adjacent teeth returns |
S. J. Davies,1 R. M. J. Gray,2 and S. A. Whitehead,3 In
In most patients the existing occlusal scheme will be functional, comfortable and cosmetic; and so if a tooth or teeth need to be restored, the most appropriate way to provide the restoration(s) would be to adopt a ‘conformative’ approach: that is to provide treatment within the existing envelope of static and dynamic occlusal relationships. There will, however, be situations where the conformative approach cannot be adopted, and this section aims to describe what is ‘Good Occlusal Practice’ in these circumstances.
In this part, We will discuss:
The ‘conformative approach’ is not always possible or appropriate for ‘small cases’
The ‘re-organised approach’ is not always needed or appropriate for ‘large cases’
The term ‘the re-organised approach’ conjures up ideas of full mouth crown and bridgework even at a differing occlusal vertical dimension. This may be the case for rare situations, but it is not only the ‘major’ cases that need the extra thought and processes that comprise the re-organised approach. Equally it is often the case that with some care in planning the treatment sequence, apparently complex cases can still be completed within the conformative approach. This will be illustrated in addition to a description of how to ‘re-organise’ an occlusion.
This appears to be self evident. However, it is easy to fall into the trap of intending to restore the teeth to the pre-existing occlusion, but to then set about destroying the occlusal surfaces of so many teeth as to make it impossible to return to the pre-existing occlusion when trying to record the inter-arch relationship (bite) later in the treatment sequence.
Changing the Occlusion May not be Inevitable, Even in Complex Cases
It may be necessary to modify the treatment plan, always leaving sufficient reference points to ensure that as the new restorations are provided they create an occlusion which conforms. For example, preparing alternative teeth at different visits may overcome the problem even in a quadrant in which all the teeth need to be restored. Alternatively, it may be possible to prepare all the teeth at the one visit but safeguard the situation by recording an intermediate registration after the preparation of only some of the teeth. This intermediate registration then becomes the reference point once the remaining teeth have been prepared (Figs 25 a,b,c).
 |
 |
 |
| Fig. 25a Pre-operative view before proposed crown preparation of LL4,5,6,7 (34,35,36,37) | Fig. 25b LL4 (34), LL6 (36) are prepared and Duralay ‘bites’ taken on these teeth using occlusal contacts on LL5 (35) and LL7 (37) to ensure the ‘conformative approach’ | Fig. 25c All teeth are now prepared, but bites against LL4 and 6 ensure models are mounted to pre-operative registration (conformative approach) |
These approaches are simply examples of following the EDEC principle and may avoid the complication and danger of changing the occlusion, when initially it seemed inevitable.
It may be that the treatment objectives, of the dentist and patient, exclude the ‘conformative approach’. Examples would be:
The vast majority of TMD patients do not need anything other than a period of appropriate splint therapy to provide long-term resolution of their TMD symptoms.1 There is, therefore, no universal justification for the so called ‘second phase of treatment’ of TMD involving unnecessary restorations. There will be, on rare occasions however, some patients who maybe need some permanent alteration of their teeth to prevent the reoccurrence of their TMD, and other patients who not only have a primary need for restoration of their teeth but also who have a TMD. These patient, in the authors’ opinion, require the closest adherence to the principles of the re-organised approach.
The EDEC principle when restoring complex cases to the conformative approach
E = Examine the pre-existing occlusion
D = Design an operative procedure which allows the conformative approach
E = Execute that plan
C = Check that each stage of the restoration conforms to the occlusion of the previous stage
The reference points of the pre-existing occlusion may be lost with the first sweeps of the air rotor
Plan to provide new restorations to a different occlusion which is defined before the work is started: ie ‘to visualise the end before starting’: this is there-organised approach.
Change the occlusion, without having planned the new occlusion and the related jaw relationship. To provide an occlusion which does not conform with the previously well tolerated one. This is an occlusion that has been arrived at by accident: iethe unorganised approach.
At its very simplest, it is to provide restorations, which although changing the occlusion, will be well tolerated by the patient at every level. No occlusion can be said to be ‘intrinsically bad’; an occlusion may only be judged by the patient’s reaction to it.
An adverse or poorly tolerated reaction may include the following:
Singularly or collectively these represent a most unhappy outcome to dental treatment. The vast majority of dentists who have been actively involved in the provision of extensive restorative treatment plans have some experience of the distress that any or all of these sequalae produces.
For every dentist actively involved in the provision of advanced restorative treatments there is always the danger that a patient will react adversely to our treatment, but we believe that this strategy makes it much less likely. This is because the principle of providing an occlusion to the re-organised approach is to provide an occlusion that is ideal to the patient, at every level.
The definition of ‘ideal occlusion’ needs to be given at the tooth level, at the system level and at the patient level.
An ideal occlusion will provide:
An ideal occlusion will provide:
An ideal occlusion will be within the neuromuscular tolerances of that patient at that time in their life. It is only by careful adhesion to the characteristics of an ideal occlusion at the tooth and system levels that one can do more than just ‘hope’ that a new occlusion falls within the neuromuscular tolerances of the patient.
Essentially the only difference between the conformative and the re-organised approach is that the re-organised approach is the conformative approach with the extra stages of designing and executing a new occlusion before providing the definitive or ‘final’ restorations
As soon as these stages have been completed, the emphasis is to ensure that the definitive restorations conform to the design that was planned and executed in the provisional restorations.2
The re-organised approach is, therefore, the provision of a more appropriate occlusal scheme prior to delivering the final restoration. It is impossible to confidently proceed directly to final changes in the occlusal scheme and for the most part some form of ‘mock up’ is employed, usually in the form of a diagnostic wax-up. How to plan and manage the change in occlusal relationships is the challenge. Once the changes are made then the definitive restorations become ‘conformative’ in approach: that is, conforming to a new occlusal scheme.
It is impossible to confidently proceed directly to final changes in the occlusal scheme and for the most part some form of ‘mock up’ is employed, usually in the form of a diagnostic wax-up. How to plan and manage the change in occlusal relationships is the challenge. Once the changes are made then the definitive restorations become ‘conformative’ in approach: that is, conforming to a new occlusal scheme. It is impossible to make comprehensive rules for the management of every clinical situation. However, the following guidelines for planning the re-organisation of the occlusion provide a broadly applicable protocol.
Recording Jaw Relationships.
The first essential part of the examination is to determine whether the patient’s existing centric occlusion occurs in centric relation; if it does not, and assuming that the decision to re-organise the occlusion has been taken, centric relation must be found. The reader will note that the EDEC sequence differs from that in the comformative approach not only in the examination but also in the execution phase. This is to estimate whether the new (centric) occlusion can be made to this ideal jaw relationship. It is optimal if it can. The difficulty in recording jaw relationships has already been discussed. The use of articulators becomes more critical if any degree of reproducibility is to be achieved in restorative cases where there are major changes to occlusal relationships. The accurate assessment of centric relation may be made more difficult by the length of time that patients have been functioning with their less than ideal occlusion incorporating habitual closure patterns and the guarding of potentially uncomfortable deflective contacts. It is often, therefore, necessary to ‘de-programme’ the musculature for some period of time before recording centric relation.
Bimanual manipulation of the jaw into a reproducible position can be difficult and some form of appliance may be necessary. At the chairside, an anterior bite plane (‘Lucia jig’) may be constructed in acrylic resin. This may be worn by the patient for some time in the chair to ‘de-programme’ the musculature prior to manipulation. Even, this may be ineffective and a stabilisation splint may have to be employed.3 This is a hard splint made to cover whichever dentition has the most missing teeth and aims to be a facsimile of an ideal occlusion (CO=CR and anterior guidance at the front). It is interesting to consider that the use of splints may comprise part of the examination phase of the re-organised approach, rather than being reserved solely for treatment of a TMD.
The static occlusion is also examined on a tooth level to discover the existence of any incline contacts between the cusps of opposing teeth.
The dynamic occlusion needs to be examined with a view to discovering any posterior interferences on the working (WS) or non-working sides (NWS). In addition an estimate of the condylar angles should be made. This can either be done on a semi-adjustable articulator by the use of latero-protrusive wax records or by simply adjusting the condylar angles of the articulator until the space (or lack of it) between the molars on the NWS is the same as it is in the patient. This can only be done if a face bow record has been used to mount the upper models into the articulator.
It is advisable to accurately duplicate the stone models at the correct centric relation and occlusion on the articulator. A mock equilibration can then be carried out on one set, whilst not sacrificing the hard earned accurate record which represents the patient’s existing occlusion on the other set (ie the starting point of the treatment). This mock equilibration, involving many small occlusal adjustments, is carried out on the stone models until multiple and ideal contacts
The examination phase of the process is completed when the clinician has a set of articulated models that are an accurate representation of the patient’s occlusion and jaw relationship between opposing teeth occur in centric relation. The sequence of these adjustments on the models is recorded as an aid for subsequent clinical equilibration carried out in the mouth.2
If the adjustments of the stone teeth exceed that which the clinician judges to be possible or prudent for the real teeth, then an important conclusion will have been reached: that it will not be possible to achieve an ideal occlusion without major alteration to those teeth.
This may indicate a need for considering any of the following:
The next stage in the design of the new occlusion is a diagnostic wax up. In this process the correctly mounted and now equilibrated casts are modified by the application of wax as a mock-up of the final restorations or prostheses. It is best if this is carried out by the clinician; but if it is carried out by the technician, the final responsibility of design still rests with the clinician. It is, therefore, of paramount importance that the technician providing the wax up understands that there are limitations to the provision of restorations because it is possible to ‘cheat’ in the laboratory but not in the mouth. The diagnostic wax up gives positive information on the occlusal scheme that can be generated. It is a valuable guide to the treatment objective for both the clinician and the technician and it should be agreed by both parties before the patient’s teeth are touched. The concept of the ‘ideal occlusion’ should be incorporated wherever possible. The diagnostic wax up can also reveal information regarding the need for crown lengthening and orthodontic tooth movement, in addition to being a wonderful guide to the optimum crown preparation form. A diagnostic wax up will provide the template for the temporary restorations. Finally it gives the patient an opportunity to visualise the treatment and enhance their ability to make informed choices.
The greatest difficulty in designing the occlusion in a diagnostic wax up is to create the occlusal planes. This can be assisted by the use of a ‘flag’ on the articulator. By the use of this device a approximation of the centre of the curves of Wilson and Spey can be made.
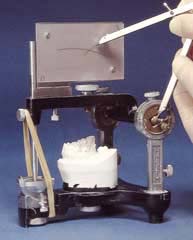
Step 1. Mount the models on a semi-adjustable articulator, after taking a facebow record and set the incisal pin to record the vertical height, with the models in occlusion. Now remove the upper model and attach the ‘flag’. (Fig. 26)
 |
| Fig. 26 The flag is attached to the articulator and the incisal pin is set before the upper model is removed |
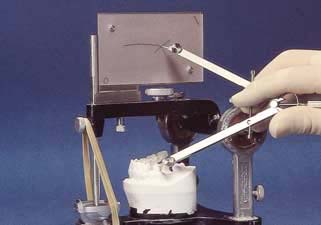
Step 2. Draw an arc on the flag at a set radius from the tip of the lower canine, assuming that the canine is not due to be restored to an increased height. If it is, then a new cuspal tip is waxed up first, and that is used. This is the first stage of trying to find the centre of the sphere which incorporates the ideal occlusal planes. This technique is based upon the long held concept that the occluding surfaces of the upper and lower teeth move relative to each other as if over the surfaces of a sphere with a radius of about four inches, and that the height of the lower canine is the least likely to be changed (Fig. 27)
 |
| Fig. 27 An arc is drawn on the flag at a set radius using the tip of the lower canine as its centre (Canine Arc) |
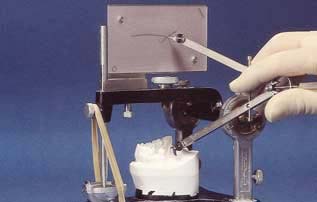
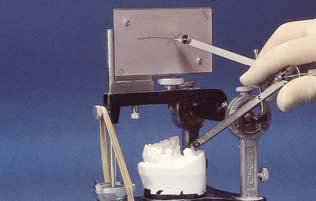
Step 3. A point along this arc (canine arc) is now found which will be the centre which determines both the antero-posterior occlusal plane (Spey) and the lateral plane (Wilson). As a starting point for establishing the centre of these occlusal planes, the canine arc is firstly bisected by an arc that uses the hinge (TMJ) of the articulator as its centre, using the same radius (Fig. 28).
 |
| Fig. 28 The canine arc is bisected by an arc using the articulator hinge as its centre. This intersection is the centre of a possible occlusal plane (sphere) |
Step 4. The antero-posterior occlusal plane provided by this centre is tested by reversing the dividers so the point is placed onto the bisection of the arcs and the graphite end is used to draw onto the lower teeth (Fig. 29 a–c). In this way a harmonious occlusal plane of the proposed restoration can be developed by examining the effect that it would have on the existing lower teeth. At this stage the upper model can be replaced for a similar test, or this examination can be left until the waxing up stage of the treatment planning. The centre of the occlusal planes that is determined by this process is not ‘cast in stone’, it can be and often must be moved forwards or backwards along the ‘canine arc’ until an occlusal plane is found that, whilst still an arc, is compatible with the position of the existing teeth.
 |
 |
 |
| Fig. 29a Proposed occlusal plane obviously still touches the tip of the lower canine | Fig. 29b Relationship of proposed occlusal plane to the mesial abutment and to pontic of the planned bridg | Fig. 29c Relationship of proposed occlusal plane to the distal abutment of the planned bridge |
A plane from a centre too far forward will be too traumatic to the opposing teeth (Fig. 30a), whereas if the centre of the occlusal plane was too far back along the ‘canine arc’ the preparation of the distal abutment would be too radical (Fig. 30b).
 |
 |
| Fig. 30a This occlusal plane would be impossible against the opposing molar | Fig. 30b This occlusal plane would be too traumatic to the distal abutment of the proposed bridge |
It is emphasised that this technique is suggested as an aid to diagnostic waxing; it is not prescriptive. It does not suggest that occlusions should be restored to a sphere that has a radius of four inches! This would clearly be ridiculous. This technique gives the clinician, who is planning the restoration of an occlusion, the opportunity to provide smooth and harmonious occlusal planes with a predictable effect upon the existing teeth. This information can now be used in the creation of a wax up of the definitive restorations (Steps 5 to 8).
Step 5. Firstly cut down the teeth on the lower model, which are destined to be restored, to about 1.5 mm below the proposed occlusal plane. Next add wax to these teeth and any gaps to be restored to a level above the proposed occlusal planes.
Step 6. Use a knife attached to the geometric dividers to trim the wax down to this plane. This will give the position of the cusp tips of the teeth to be restored, on both the curves of Wilson and Spey (Fig. 31a–c).
| Fig. 31 Wax carved to proposed occlusal planes | ||
 |
 |
 |
| Fig. 31a | Fig. 31b | Fig. 31c |
The EDEC principle in the re-organised approach
E = Examine the characteristics of the existing occlusion, including jaw relationship
D = Design and plan the new occlusion
E = Execute the new occlusal prescription prior to definitive restorations
C = Check that you are conforming to this new occlusion in the definitive restorations
Is equilibrium possible? Practice on plaster before making irreversible changes in the mouth
Step 7. Carve morphology into the wax to create the waxed up teeth (Fig. 32). (How do you carve an elephant out of a block of marble? Knock off all the bits that don’t look like an elephant.) .
|
|
| Fig. 32 Morphology is carved into the wax, to represent the final abutments and pontic of the proposed bridge to a planned occlusion |
Step 8. The wax up of the lower arch is now complete and the upper model is refitted to the articulator (Fig. 33). So that the incisal pin again rests on the incisal table, adjustment will usually be needed to the opposing teeth in the upper arch, this may be minor equilibration or significant change to severely overupted teeth. Note: These adjustments will need to be made when the lower restoration is fitted; the patient must be advised of this at the planning stage.
|
|
| Fig. 33 Minor occlusal adjustment is necessary to the teeth opposing the abutment teeth, whereas the crown on the overupted tooth opposing the gap ( in this case) will need to be replaced |
A wax up of a proposed restoration is an ideal opportunity to see the end point of an occlusal change, before picking up a handpiece. The improvement in the occlusion can be developed and visualised (Figs 34a,b and 35a,b)
 |
 |
| Fig. 34a Pre-operative lower model | Fig. 34b Lower model after wax up to idealised occlusal planes |
 |
 |
| Fig. 35a Pre-operative lower model, illustrating lingual and mesial tilting of distal abutment of proposed bridge | Fig. 35b Lower model after wax up illustrating improved occlusal planes |
(E = executing the planned new occlusion and jaw relationship)
Equilibration will already have been performed on the models in the design phase; so the end point and adjustments required to reach it will already be known. This ‘mock equilibration’ is highly recommended. It prevents anxiety in the mind of the clinician who when carrying out an equilibration may otherwise wonder whether he or she will be able to finish what they have started! The aim of equilibration is to effect changes in the centric occlusion to give it as far as possible the features of an ideal occlusion:
It may not be possible in every case to provide all of the features of an ideal occlusion. It is inevitable that dentists as restorers and replacers of teeth, sometimes change occlusions. These guidelines are listed to emphasise the point that we should plan to make the changed occlusion as ideal as possible so reducing the risk of precipitating adverse reactions. This aim must be achieved in the pretreatment phase so that the definitive restoration can follow a conformative approach, using the occlusion that has been developed in the design and pre-treatment phases as the starting point.
The planning and design phase of the process is completed when the clinician has a set of articulated models and is confident that they are an accurate representation of the end point of the treatment plaN
Teeth may be moved in three planes to a position that is compatible with the aim of the treatment plan.5 Whether orthodontic movement of teeth is needed is determined at the study model stage.
Provisional restorations are always useful and sometimes essential in the management of the re-organised approach. All the information regarding the occlusal scheme of the final restorations should be programmed into the provisional restorations. Subtle changes may be required but the final restorations should conform to the provisionals. The provisions are used to ‘develop’ the re-organised occlusion.
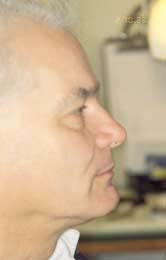
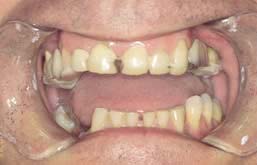
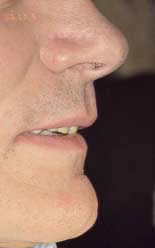
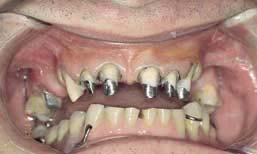
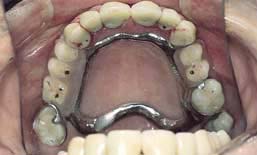
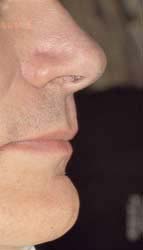
Cases when the re-organisation of the occlusion includes an increase in vertical height are amongst the most difficult, and so the most essential to plan. The new occlusion including the change in the vertical dimension must be tested (against the tolerances of the patient) by the placing of provisional restorations. A provisional removable prosthesis ie splint,6 may provide the ideal means of doing this, as it can be modified in the development of the treatment plan. In Fig. 36a–j, a patient with severe tooth surface loss and consequential loss of vertical dimension (Fig. 36a) has been treated initially by the provision of a removable stabilisation splint (Fig. 36c); this was not only the means of testing the tolerance of the new occlusion in three dimensions but also the vehicle to test the anterior aesthetics by means of acrylic labial veneers (Fig. 36d–f).
 |
 |
 |
| Fig. 36a Patient’s profile, suggesting loss of vertical dimension | Fig. 36b Patient’s dentition exhibiting significant tooth surface loss | Fig. 36c Upper stabilisation splint with labial veneers to fit over unprepared upper anteriors |
 |
 |
 |
| Fig. 36d Mirror view of upper stabilisation splint | Fig. 36e Anterior view of upper stabilisation splint. Note the provision of median diastema | Fig. 36f Provisional restoration vertical dimesion and labial support by the upper stabilisation splint. Compare with Fig. 36a |
Once the occlusion has been prescribed in this way, it is relatively straight forward to proceed to the definitive restorations of upper and lower partial dentures and anterior crowns (Fig. 36g–j). In this case, the patient was also able to decide that he preferred not to have the central incisor diastema that had been incorporated into the provisional splint ( contrast Fig. 36e and j ).
 |
 |
| Fig. 36g Definitive lower restoration by partial denture and crown preparations of upper anterior teeth, at the prescribed vertical dimension | Fig. 36h Mirror view of upper definitive restoration by partial denture and anterior crowns as developed in the ‘provisional’ phase |
 |
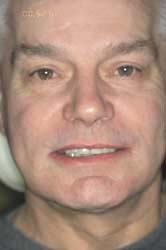 |
| Fig. 36i Restoration of vertical dimension and labial support | Fig. 36j The re-organised occlusion |
Provisional restorations can be either chairside or laboratory made. Each have their own advantages. Both are adjustable and allow changes to be made until appropriate occlusal contacts and aesthetics are developed. In this context ‘appropriate’ means ‘accepted by the patient.’
(C =Checking that the definitive restorations conforms to the occlusion that has been designed and executed in the previous phases)
Once the provisional restorations are at the stage when the clinician and the patient are satisfied, they can be replaced by the definitive restorations now using the conformative approach.
It is unwise to proceed with the definitive restorations while the provisional restorations are giving any problems or the patient is not comfortable.
The challenge for the laboratory technician is to ‘copy’ the occlusal features that have been ‘developed’ in, and shown to be comfortable by, the provisionals. A customised incisal guidance table is a good way of copying the guiding surfaces of the upper anterior provisional crowns in order to prescribe the same anterior guidance (Fig. 37a–f).
 |
 |
 |
| Fig. 37a The models, including provisional crowns on upper anterior teeth, are used to carve a custom incisal guidance table in a slow setting autopolymerising acrylic | Fig. 37b Custom incisal guidance table. The incisal pin of the articulator is resting in a position that is related to the centric occlusion of the models | Fig. 37c Custom incisal guidance table is used to guide the upper working model into the same left lateral excursion as was present in the provisional restorations (This would be a right lateral excursion in the patient) |
 |
 |
 |
| Fig. 37d Close up of custom incisal guidance table, guiding upper model into a left lateral excursion | Fig. 37e Using this technique it is easy to see exactly what the crown length and palatal contour should be to provide the same canine guidance as was present in the provisionals | Fig. 37f Custom incisal guidance table determining the length of right canine definitive crown |
A custom incisal bite table is necessary in order to be able to conform to the anterior guidance provided by the upper anterior provisional restorations.
An advanced restorative treatment plan involving the re-organisation of a patient’s occlusion is a major challenge for the restorative team. Successful completion will depend upon not only the skill of the clinician and the technician, but also the clinician’s planning.
The pre-definitive restoration phase of the process is completed when the patient has an ideal (ie tolerated) occlusion in provisional restorations
The definitive restoration phase: Re-organisation complete — now conform
The need for the restorations comes first!
The clinician will need to have:
Although it can appear to be a very long way from the starting point to the declared objective, ‘every long march has to start with a first step’ . If the objective is defined and if the successful completion of each clearly defined step is the foundation for the next phase, success will be the outcome. The key is the sequential treatment plan.
Reprinted with permission.
© British Dental Journal.
2001; 191: 365-381